Star Wars: Knights of the Old Republic - Any% No Major Glitches Guide
v5.7: Male/Female Scout/Scoundrel -> Jedi Guardian Route (Light Side)
This route defeats Malak on the Star Forge as fast as possible without major glitches. Timing begins upon clicking “PLAY” after character creation and ends when the screen cuts to black at the start of the Malak Death cutscene. A load-removal tool and auto-splitter is available for LiveSplit thanks to Lane, glasnonck and XeroHR. Times are sorted based on load-removed times, since load times vary significantly in this game, and saving is frequent. This guide will cover the character build for the run, as well as a detailed route.
If you have additional questions, you can check out the KotOR Speedrunning Discord which is linked on the game’s sidebar on speedrun.com. There’s a bunch of friendly folks there willing to answer questions!
Table of Contents:
NMG Ruleset
REMEMBER to show yourself restarting the game at the beginning of each attempt.
The Any% No Major Glitches (NMG) run is a middle-ground category between Any% Unrestricted and Any% Glitchless.
The following glitches and tricks are banned in Any% NMG:
Note: Door Clipping includes GP Warps that bypass locked doors.
These glitches and tricks are allowed:
Character Build
Choosing a Build
There are two character builds that are nearly identical in terms of average performance for the Any% NMG run: a Scoundrel build focused on Sneak Attack and a Scout build. Both builds use Two-Weapon Fighting and Flurry for their combat, and both become a Jedi Guardian at level 4. Which build you pick is up to personal preference, but the general benefits of each are as follows:
Scoundrel:
- Better combat vs. major Taris targets, Uthar, and both Malak fights
- No Weapon Focus: Melee Weapons for Taris
- More Defense (+2 due to Scoundrel’s Luck) and equal Vitality (with Stamina stim)
- Less Treat Injury (TI) on Taris but more TI after Taris (+3)
- Worse Fortitude and Will saves (-2)
- Must swap combat feats to Flurry for all fights
- Need to position for Sneak Attacks in some fights
Scout:
- Guaranteed Alacrity on Spire, saving 10-11 seconds due to better shopping route
- Weapon Focus: Melee Weapons for Taris
- Better Fortitude and Will saves (+2)
- Less Defense (-2) and equal Vitality (unless a random Stamina stim drops)
- More TI on Taris (+5 with Empathy) but less TI after Taris (-2)
- Flurry is the default combat feat
- Can spam Flurry in all fights
Overall the real comparison is the guaranteed Alacrity for the Scout vs. the better combat for the Scoundrel. If Scoundrel can save four combat rounds due to the effectiveness of Sneak Attack, it makes up for the time loss due to no Spire Alacrity. There’s also a very small chance (see Credit Route) that a random Alacrity can drop on Endar Spire, meaning the best outcome would be a Scoundrel with the random Alacrity drop. Some runners may prefer the slightly better bulk and consistent early timesave of a Scout, and Scouts could also get lucky combat rolls on the relevant fights.
Character Creation
Choose whichever class you want based on the discussion above. Either Male or Female works for both builds, with the only difference being one conversation (plus another in a backup strat).
Initial Attributes:
| Attribute |
Scoundrel |
Scout |
| Strength |
18 |
18 |
| Dexterity |
12 |
12 |
| Constitution |
14 |
14 |
| Intelligence |
8 |
10 |
| Wisdom |
8 |
8 |
| Charisma |
12 |
10 |
We are going to focus on melee attacks with a lightsaber, so we max out Strength immediately, and get enough Dexterity and Constitution to help us survive. The points in Charisma ensure all Persuade checks will succeed without the need for Force Valor; if you really wanted to, you could do 14 Dex and 2 fewer Cha at the cost of needing Force Valor before key Persuade checks with Yuthura, Lashowe, Czerka Guards on Kashyyyk (for Scouts), and Bastila.
Scoundrels should use 8 Int and 12 Cha, while Scouts should use 10 Int and 10 Cha. Scouts need 10 Int to reach +4 net Computer Use and save a computer spike when hacking, while the extra feat for Scouts is Empathy, canceling out the difference in Charisma as far as Persuade goes.
Initial Skills and Feat:
| Skill |
Scoundrel |
Scout |
| Computer Use |
0 |
4 |
| Demolitions |
1 |
1 |
| Stealth |
1 |
0 |
| Awareness |
0 |
0 |
| Persuade |
4 |
0 |
| Repair |
0 |
0 |
| Security |
1 |
1 |
| Treat Injury |
0 |
4 |
| Feat Chosen: |
Flurry |
Focus: Melee |
The points in both Demolitions and Security are strictly for tricks; 1 point in Demolitions enables the MC to perform Jedi Mine Trick, while the point in Security is for a door on the Endar Spire.
For Scoundrels, the point in Stealth guarantees a Stealth Field Generator in the initial footlocker, which we sell for 40 additional credits in the early game. Scoundrels put points in Persuade but not Treat Injury (TI) because Persuade is a Class Skill while TI is not. We will put more points in both once we become a Jedi Guardian.
For Scouts, the points in Computer Use (and 10 Int) let us save 1 spike while hacking on the Endar Spire, yielding a smoother spike route on Taris. Scoundrels do not need this because they have a guaranteed spike drop in their initial footlocker. Scouts put points in TI but not Persuade due to Class Skills, and also put more points in both when they become a Jedi Guardian.
We choose Flurry because it’s an overall better combat feat for the run; more attacks per round yields more bonus damage from Sneak Attacks. We choose Flurry or Focus: Melee over Two-Weapon Fighting at character creation because it takes longer to select, so at level 2 it’s faster to pick Two-Weapon Fighting. Since character creation isn’t timed, this is optimal.
Leveling Plan
Scoundrel:
| Level |
STR |
Feats |
Skills |
| 1 |
18 |
Flurry, Sneak Attack I, Scoundrel’s Luck |
Demo to 1, Stl to 1, Per to 4, Sec to 1, Save 5 |
| 2 |
18 |
Two-Weapon Fighting |
Save All |
| 3 |
18 |
Sneak Attack II |
Save All |
Scout:
| Level |
STR |
Feats |
Skills |
| 1 |
18 |
Weapon Focus: Melee Weapons, Flurry |
Com to 4, Demo to 1, Sec to 1, TI to 4, Save 2 |
| 2 |
18 |
Two-Weapon Fighting |
Save All |
| 3 |
18 |
Empathy |
Save All |
Jedi Guardian:
| Level |
STR |
Feats |
Powers |
Skills |
| 4 |
19 |
Improved Two-Weapon Fighting |
Affect Mind, Stun Droid |
Save All |
| 5 |
19 |
|
Force Valor |
Save All |
| 6 |
19 |
Improved Flurry |
Burst of Speed |
Per to 9, Rest in TI |
| AL7 |
20 |
|
Stun |
+1 to Awareness (Scoundrel) or TI (Scout) |
| 8 |
21 |
|
Disable Droid |
Per to 10 |
| 9 |
21 |
Master Two-Weapon Fighting |
Knight Speed |
Per to 11 |
| 10 |
21 |
Master Flurry |
Knight Valor |
Per to 12 |
| AL11 |
22 |
|
Stasis |
+1 to TI |
Auto-Level Attributes:
- When Auto-Leveling the MC, the game only checks your Jedi class level when deciding whether to give an attribute point, rather than your overall character level. That means you can use Auto-Leveling to gain extra points in STR at Jedi levels 4 and 8, which correspond to character levels 7 and 11. This is why we Auto-Level at 7 and 11, making it to 22 base STR at level 11.
Skill Notes:
- We only add points to Persuade or TI; all other skills stay at their initial levels.
- We need Persuade for several conversations:
- On Dantooine, we must Persuade Juhani to return to the Jedi.
- On Manaan, we must Persuade the scared scientists to lower the force field.
- On Korriban, we must Persuade Yuthura to allow us to enter the academy.
- On Korriban, we must Persuade Lashowe to ally with us in pursuit of the holocron.
- On Korriban, we must Persuade Kel Algwinn to disclose his doubts to us.
- On Kashyyyk, we must Persuade the Czerka guards to disclose the codes to the sonic emitters.
- The rest is put into Treat Injury once we are a Jedi to make our medpac use more efficient.
Feat Notes:
- Flurry outdoes Critical Strike in the overall run by about 3 combat rounds on average. The extra attack from Flurry yields more damage in general, but also more Sneak Attack damage when relevant.
- Flurry and Two-Weapon Fighting are our main combat core. As a Scoundrel, taking Flurry forces us to skip Weapon Focus: Melee Weapons on Taris, but overall this is better.
- Scouts get one extra feat at level 3, which is Empathy. This cancels out the difference in Charisma for Persuade purposes, and gives Scouts a small boost to TI.
Force Power Notes:
- The Force Powers chosen are the same regardless of starting class. Both builds become a Jedi Guardian.
- Force Speed is the most important Force power, giving double movement speed, although Save Teleports are eventually the fastest form of movement. Knight Speed also grants +1 attack per round, which is highly important due to our relatively low chance to hit, and to maximize Sneak Attack damage bonus as a Scoundrel.
- Force Valor is used to boost stats for as many fights as possible. Knight Valor also gives us Immunity: Poison, which protects against Affliction and Plague on the Star Forge.
- Disable Droid is used to free the Captured Jedi during the Malak fight at the end of the game. This denies them to Malak, meaning you only have to kill him twice. It also fills up your Force Points as well, though not your health.
- Affect Mind is used only to avoid landing fees on Manaan, Tatooine, and Kashyyyk. This lets us afford 2 extra Life Support Packs, plus we don’t really need the extra Force Power for anything else.
- The Auto-Level granted powers Stun and Stasis aren’t used by MC, but will be used by Bastila and Jolee…
Experience Thresholds
There are three important XP thresholds in this run:
- 36000 XP: Reaching Level 9 before the fight with Uthar and Yuthura in the Tomb of Naga Sadow
- 55000 XP: Reaching Level 11 before the fight with Bastila on Star Forge
- 55250-55430 XP: Bastila and Jolee reaching Level 10 before Viewing Platform (see Party Experience below)
Level 9, Level 11, and Bastila and Jolee’s Level 10:
The minimum XP for the run misses all of these thresholds, so we bring Juhani and Zaalbar to Hrakert Station with us so that they and the insane Selkath can get extra kills while we run through the station collecting underwater gear. The most extra experience needed to hit all three thresholds is 3,450 XP, which generally requires Juhani and Zaalbar to kill all three patrol droids in the first long hallway, and at least a couple insane Selkath to die from either each other or the droids. There are a couple ways to check how your XP looks, and a couple backups if you’re likely to fall short.
Checks:
- While leaving Hrakert Station, hover your mouse over your character portrait. This pops up a tool-tip showing your character stats, including how much XP is needed to reach the next level. This updates in real time, so you can see exactly where you are when you leave. If you are at 900 XP left until level 8 or less before leaving the station, you’ll hit all three thresholds without issue. If you are at 1990 XP or less, you’ll hit level 9 in time for the Uthar and Yuthura fight.
- If you find that method of checking awkward, the timing of level 9 provides a convenient way to check as well. If you hit level 9 anytime before the Jedi Mine Trick on Uthar (including after his first conversation), then you are guaranteed to hit level 11 correctly. This does not necessarily guarantee the final threshold, however, as there is a small range of XP where you can hit level 11 but Bastila and Jolee will not hit level 10.
Backups:
- The first backup is to try to kill an extra enemy or two on Korriban (shyracks), Leviathan (Sith Soldiers), Kashyyyk (Katarn or Kinrath), Lehon (not many good options), or Star Forge (random Dark Jedi/Sith soldier). Depending on the enemy you pick and how quickly they die, this can be the fastest way to make up extra experience.
- The second backup is to kill Bastila on the Star Forge. This has the benefit of knowing for sure whether or not you hit level 11, as well as giving a lot of experience (1350 XP for challenge rating 18 at level 10), almost always ensuring you hit your last two thresholds. But this backup requires a longer conversation and a tougher fight than some random monster somewhere, so it may be slightly slower.
Party Experience:
The reason the last threshold is a range is because of how Party Experience works in KotOR. Typically, party members get 80% of the XP that the main character gets, whether or not they are in your party or even recruited yet. There are, however, a few exceptions:
- Any experience given to MC to force Level 2 on the Endar Spire bridge is not credited to party members. The most XP that can be granted is 175 XP, which means party members could lose out on as much as 140 XP this way. This can be mitigated by killing extra Sith Soldiers before the level up is forced; one extra means only 100 XP is granted (80 lost), two extra means only 25 XP is granted (20 lost), and three or more means no XP is granted, and thus none lost.
- MC is supposed to earn 1000 XP when the party member chosen in the Leviathan Prison Block frees them from confinement. However, due to a bug the MC does not receive that XP. All party members, however, are correctly granted 80% of that amount, effectively giving each party member 800 extra XP.
- For some reason, Carth’s XP growth is nerfed after leaving Taris until he falls in line with the 80% XP threshold. Carth is the only party member guaranteed to be recruited above your level, so this is probably an attempt to even out his XP with those of your other party members. This is not relevant in the speedrun.
Thus the last XP threshold depends on how many extra Sith Soldiers die on Endar Spire. The level up is forced when you kill the front two soldiers in the bridge, and there are three relatively simple ways to try to kill extras:
- Try to kill one of the Sith Soldiers in the second room after opening the door but before the CS starts. You’ll only kill if you crit, but Trask will sometimes help, and he can rarely manage to kill one by himself.
- Delay the frag grenade throw to the three Sith Soldiers as long as possible. This allows two additional soldiers to run in behind them, and one may be killed by the grenade.
- Delay killing the front two bridge Soldiers until you run forward into the bridge. Reaching a certain point triggers explosions which are guaranteed to kill the back two Sith Soldiers, which does grant you the XP for each kill.
Whether you choose to do employ these methods or not is up to you; it’s entirely possible to hit the highest XP threshold of 55430 XP without extra issue, and each of the above (except the first) does slightly slow you down on Spire.
Equipment Plan
Head: Verpine Headband - Found on Dantooine, Casus Sandral’s corpse
- This is the most convenient mask to grab, giving +3 to our Will save, which is our weakest.
Gloves: Strength Enhancer - Found on Taris, Sith Governor’s corpse
- This is used for the +1 Strength, which nets us an extra +1 STR modifier for every relevant fight except the Triple Sith entire run (thanks to Auto-Level Attributes).
Body: Jedi Knight Robe - Found on Dantooine, Nemo’s remains
- We want to wear robes to allow us to cast our Force powers, and this is the most convenient robe to grab, since we loot Nemo anyway for the Sigil crystal.
Weapon: Double-bladed Lightsaber - Found on Taris, Brejik’s “corpse”
- We borrow Bastila’s lightsaber for the run (and probably give it back afterwards). The crystals we use are as follows:
- Sigil Crystal: Placed after Tatooine, used for +1 Attack
- Opila Crystal: The only other convenient crystal on our route. The damage boost and massive critical hits makes it worthwhile. Placed after Tatooine.
- Solari Crystal: The best crystal in the game and the reason we try to eventually be Light-aligned (see below). Replaces Opila after Lehon.
Belt: Nerve Amplifier Belt - Found on Tatooine, Chewed Twi’lek corpse
- The Nerve Amplifier Belt is a convenient belt that gives the essential Immunity: Mind-Affecting. We don’t have the credits to afford the CNS Strength Enhancer in this run, and this is the next best alternative.
All of our equipment should be equipped once we leave Tatooine, with the exception of the Solari crystal which is placed after Korriban. We’ll also use the Combat Suit, Prototype Vibroblade and a basic Vibroblade while on Taris.
Credit Route
The new credit route always has exactly three shopping trips. Our credits all come from either selling items we don’t need or looting credits; we also loot some extra corpses to be able to afford all the stims we want on Korriban.
1. Larrim on Taris
- Sell: All except Medpacs, Computer Spikes, Concussion and Frag Grenades, Stims
- Buy: 2x Concussion Grenades, 1x Battle Stimulant, 4x Minor Mines
- Scouts Also Buy: 1x Frag Grenade
- For possible tweaks to this shopping trip, see Other Random Loot below
2a. Zelka on Taris
- Buy: 3-4x Adrenal Alacrity, 1x Adrenal Stamina
2b. Crattis Yurkal on Dantooine
2c. Selkath Merchant on Manaan
3. Czerka Shop on Korriban
- Sell: All except Adv Medpacs, Computer Spikes, and Mines
- Buy: 6-8x Life Support Pack, 5x Echani Battle Stimulant, 5x All Hyper Adrenal Stims
Buying Alacrities
The second shopping trip for Adrenal Alacrities depends on whether or not you get an Alacrity on the Endar Spire. Scouts are guaranteed an Adrenal Alacrity in their initial footlocker, while Scoundrels must rely on an unlikely random drop. An Alacrity can drop randomly either when recruiting Trask or when looting the Sith Heavy Trooper in the Starboard Section. Both opportunities are only a 1 in 240 chance, meaning you have a net 0.83% chance of getting at least one random Alacrity on Spire.
Your second shopping trip should be:
- With Zelka: Only if you are a Scoundrel that did not get a random Alacrity drop on Endar Spire
- Scouts should never shop with Zelka, and Scoundrels that get a random Spire Alacrity should use the same stim route on Taris as Scouts
- On Dantooine: If you have no Alacrities at the start of Dantooine
- This will happen as a Scout with no random Taris alacrities, or a Scoundrel with Spire Alacrity but no other random Taris alacrities
- On Manaan: If you have no Alacrities at the start of Manaan
- This will only happen if you have not shopped at either previous location
As noted, the chance of a random Spire Alacrity is extremely low, so Scoundrels will almost always be shopping with Zelka, whereas Scouts should never shop with Zelka and will usually shop on Dantooine. Shopping on Dantooine is 10-11s faster than shopping with Zelka. Shopping on Manaan will be extremely rare, but saves about 4s over shopping on Dantooine if you are that fortunate.
You should only have to do one of these shopping trips unless you use extra Alacrities somewhere, either because MC dies somewhere on Taris or you accidentally use one where you shouldn’t have.
Other Random Loot
There are a few other random drops possible on the Endar Spire that can affect your initial shopping trip with Larrim. Most are centered around grenades; you need to leave Larrim with at least 2 Concussion Grenades and 1 Frag Grenade (for the Lower Sewers), but with random loot you could have up to 4 Concs and 3 Frags. The more of each you get, the easier the fights with the Assault Droid (for Concussion Grenades) or the Lower Sewers Rakghouls (for Frag Grenades) will be.
1. 2x Concussion Grenade
- Chance: 0.83%
- As a Scout, this doesn’t affect your shopping with Larrim at all, just how you use your Concussion Grenades. If you get this random drop as a Scoundrel and do not have 2 or more Frag Grenades at the start of the shopping trip, you should buy 1x Concussion Grenade and 1x Frag Grenade instead of 2x Concussion Grenade. If you got this drop and a random Frag Grenade on Spire, you can either still buy 2x Concussion Grenade (giving you a whopping 5 Concs for Taris), or buy 1 Conc and the fifth stim from Zelka.
2. 1-2x Frag Grenade
- Chance: 10.7% of at least one
- This only changes Larrim’s shopping if you’re a Scout, in which case you can skip buying the Frag Grenade that you would normally buy. For a Scoundrel, getting an extra Frag Grenade makes the Lower Sewers a bit more consistent; see the discussion under Concussion Grenades above as well.
3. 1x Battle Stimulant
- Chance: 0.83%
- If you get a Battle Stimulant on the Spire, you don’t have to buy one from Larrim. This lets you spend those credits elsewhere, most notably buying a fifth stim as a Scoundrel from Zelka.
4. 1x Adrenal Stamina
- Chance: 0.83%
- If you get an Adrenal Stamina and you’re a Scoundrel, you never have to buy one from Zelka, and can buy the fourth Alacrity stim instead.
Any other random loot can be sold to Larrim for extra credits that will go towards either a fifth stim from Zelka as a Scoundrel, or additional Life Support Packs on Korriban.
Alignment Route
Alignment in KotOR is a sliding scale from 0 to 100, initialized at 50; higher numbers are Light, lower numbers are dark. Shifts in alignment are determined by a matrix; every alignment-shifting action is classified as Light or Dark, and then assigned a level (either Low, Mid, or High). The player character (Revan) can either be aligned as Very Dark, Dark, Neutral, Light, or Very Light. The more opposed your alignment and the action’s classification, the more drastic your shift in alignment; for example, a Light-aligned character performing a High Dark action will have a large shift, while a Dark character performing a High Dark action will have a smaller shift.
Here is the alignment route used in the run:
| Aligned |
Action |
Type |
Delta |
New |
| Neutral |
Game Start |
– |
50 |
50 |
| Neutral |
Save the alien informant |
Low Light |
+2 |
52 |
| Neutral |
Agree to kill Gadon Thek |
Low Dark |
-2 |
50 |
| Neutral |
Threaten Janice Nall to get T3-M4 |
Mid Dark |
-4 |
46 |
| Neutral |
Persuade Yuthura to admit you to the academy |
Low Dark |
-2 |
44 |
| Neutral |
Snitch on Kel Algwinn to Uthar Wynn |
Hardcoded |
-5 |
39 |
| Dark |
Spare Yuthura Ban |
Mid Light |
+6 |
45 |
| Neutral |
|
Low Light |
+2 |
47 |
| Neutral |
Stay true to the Light Side on Lehon |
High Light |
+6 |
53 |
| Neutral |
|
Highest Light |
10 |
63 |
Snitching on Kel Algwinn is for some reason hardcoded to always give -5 alignment.
The only relevance of alignment in the run is equipping the Solari Crystal. We must be at 60 alignment or higher (the boundary between Neutral and Light) in order to equip any Light Side restricted equipment. The Solari crystal is Light Side restricted, as well as being extremely good. While we used to try and equip the Solari Crystal after Korriban, the only fight that is adversely affected (on average) is the first phase of the Leviathan Malak fight, which goes from an 87% chance of a one-round to a 63.6% chance. Delaying Solari until after Lehon allows for a much more streamlined alignment route, saving enough time that the small risk of an extra round on Leviathan Malak is justified.
Almost every alignment shift we make is faster than the alternative:
- Rescuing the alien informant is the fastest way to obtain the Sith Armor.
- Agreeing to kill Gadon Thek teleports you to entrance to the Vulkar Base, saving the 45 seconds it takes to run out of the base.
- Threatening Janice Nall to get T3 is the only way to obtain him, because we don’t have the 2000 credits (and wouldn’t want to spend them if we did).
- Persuading Yuthura is the fastest way into the Sith Academy, and gaining the alignment to be able to Lie to her to avoid this is slower.
- Snitching on Kel Algwinn is part of the fastest way to gain the 5 necessary Prestige points on Korriban, and saves at least a minute over the next fastest option.
The only shift that doesn’t save time is sparing Yuthura, which at 2-3 seconds lost is the fastest way to preserve our alignment enough for the big shift on Lehon to make us Light-aligned.
Route Overview
This is a brief outline of the route for the Any% NMG run, including planet order and smaller skips:
- Taris
- Reach the Undercity and recruit Mission and Zaalbar to access Vulkar Base
- Defense Turret Skip to access Vulkar Garage
- Use Accelerator Warp to exit Vulkar Base
- Skip the Brejik Fight to rescue Bastila
- Recruit T3 to access Sith Base
- Kill the Sith Governor to get the Launch Codes
- Steal the Ebon Hawk and escape Taris
- Dantooine
- Become a Jedi Padawan
- Redeem Juhani to the light side
- Find the Star Map in the ancient ruins
- Manaan
- Raid the Sith Base to recover the Data Module for the Republic
- Sonic Buffer to skip the Mother Firaxan
- Find the Star Map on the ocean floor
- Tatooine
- Save Teleport into the Eastern Dune Sea
- Skip the Krayt Dragon to obtain the Star Map
- Korriban
- Infiltrate the Academy
- Earn five prestige points with Uthar Wynn
- Find the Star Map in Naga Sadow’s Tomb
- Leviathan
- Rescue the crew using Mission
- Skip the spacewalk sequence
- Skip the Saul Karath fight
- Defeat Darth Malak and escape
- Kashyyyk
- Save Teleport to skip visiting the Wookiee Village
- Recruit Jolee Bindo to access Lower Shadowlands
- Find the Star Map in the Lower Shadowlands
- Save Teleport to the Wookiee Village to Return to the Ebon Hawk
- Lehon
- Rescue the Elder Warrior and obtain Ship Parts
- Use the Rakatan Ritual to enter the Ancient Temple
- Defeat Bastila and stay true to the Light Side
- Repair the Ebon Hawk and fly to the Star Forge
- Star Forge
- Find and kill Darth Malak
The reasoning for the middle planets:
- Manaan is first because there are no fights we have to win, and thus our relatively weak combat abilities don’t matter as much. In addition, Save Teleports are never effective in the underwater modules, so doing Manaan before they’re effective in general lets us save them for other planets.
- Tatooine is second because there’s still no combat, but we now have long enough saves that we can Save Teleport across the desert.
- Kashyyyk is done last so we can use a Jedi Mine Trick to skip the Star Map CS; because your identity has already been revealed, the computer conversation is short enough for this to work.
- This leaves Korriban third, which is late enough that we usually reach Level 9 (and Knight Speed) before Uthar and Yuthura. We also buy top-notch stims and medpacs here to make some later fights easier.
Detailed Route
This section will describe all the actions you’ll need to take for the Any% NMG run.
Notation:
Level ups are highlighted in code block- Inventory/Equipment changes are highlighted in italics
- Item Upgrades at a workbench are highlighted in bold
Shopping trips are highlighted in large code blocks
Conversation Notes:
- If no conversation choices are specified, spamming will work (this chooses all 1 options).
- A … indicates a break in the conversation, such as changing who you’re talking to or having to talk to the NPC again
- A * indicates a variable answer, such as in reciting the Sith Code.
- A #xY indicates repeat that option Y times, as in Gadon Thek’s first conversation.
Abbreviations:
- MC - Stands for Main Character, your player character
- CS - Cutscene
- QS - Quick Save
- QL - Quick Load
- QS/QL - Quick Save then immediately Quick Load
- GP Warp - Gather Party Warp
Jump to a Section:
Endar Spire
Pre-Run Setup
- Set these Options:
- Ensure V-Sync is ON
- Ensure Auto-Level is ON in the Gameplay Menu
- Optionally, make sure you have no saved games
- Character Creation
- Male/Female Scoundrel - Custom Character
- Str to 18, Dex to 12, Con to 14, Cha to 12
- Demolitions to 1, Stealth to 1, Persuade to 4, Security to 1, Save 5
- Initial Feat: Flurry
- Pick a good name!
- Hit Play! (and be ready to Hard Buffer!)
Endar Spire
- Hard Buffer past Intro CS
- Loot footlocker
- Equip MC: Clothes
- Trask conversation twice (spam)
- Equip Trask: Blaster Pistol Offhand
- Open Buffer towards the locked door and use Security once in range
- Mash through the Carth conversation before MC finishes unlocking the door
- If the CS of the shootout between the Sith and Republic soldiers doesn’t play, you were too slow; QL and use Security again
- Use Trask’s Power Blast to kill two Sith Soldiers
- Check to see if you have an Adrenal Alacrity (Scouts will always have one)
- Loot footlocker in next room
- Open the next door and wait for the second CS of Sith vs. Republic
- Kill front three Sith Soldiers with Frag Grenade on the middle soldier
- Each has only a 10% chance to survive via Reflex save, for a 72.9% chance of killing all three outright
- If one (or more) survive, have Trask finish them while MC runs to the next door
- Open the next door for the Jedi vs. Sith cutscene
- Use Trask’s Power Blast to kill two Sith Soldiers
- Loot Jedi for Vibration Cell/Adrenal Strength
- Open the bridge and use Trask’s Power Blast to kill the front two Sith Soldiers on the bridge
- Run forward as MC until your Level Up is available
- IMMEDIATELY
Level to 2: Save skills, Two-Weapon Fighting, then begin a long Open Buffer
- Open the next two doors leaving the bridge, then target the door to the Starboard Section and drop the buffer
- Mash Trask’s conversation; this buffer prevents his death CS from triggering
- If Trask talks to you before you can begin the Open Buffer, use a Hard Buffer as you open the door before the Starboard Section
- Enter Starboard Section
Starboard Section
- Loot footlocker in Terminal Room
- Hack terminal console: 2,3
- Loot Sith Commander for Prototype Vibroblade
- Quickly check to see if you got an Adrenal Alacrity
- Carth talks to you
- Take Escape Pod to Taris
Taris 1
Upper City
- Conditional: If you got an Alacrity from Endar Spire (randomly or as a Scout), use the stims hotkey to use two stims:
- Once (for Adrenal Alacrity) before the dream CS
- Once (for Adrenal Strength) before the waking up CS in the Hideout
- If you didn’t get an Alacrity as a Scoundrel, skip both of these
- Carth talks to you: 1,1,1,5,3
- Loot footlocker for spikes and medpacs
- Equip MC: Combat Suit, Prototype Vibroblade Mainhand
- Scouts Only: Equip Vibroblade Offhand
- Exit the apartment
- Party: No change when prompted
- Hard Buffer to skip Sith Raid CS
- Run down hall to right until Larrim accosts you: 1,2,4
- See the Credit Route for possible tweaks to this shopping trip based on random loot from the Endar Spire
SHOPPING: Larrim
- SELL ALL EXCEPT:
  - Medpacs
  - Computer Spikes
  - Frag Grenades
  - Concussion Grenades (if you have any)
  - Alacrity, Stamina, or Battle Stims (if you have any)
- BUY:
  - 2x Concussion Grenades
  - Battle Stimulant
  - All 4 Minor Mines
- SCOUTS (AND SCOUNDRELS WITH AT LEAST 1014 CREDITS TO SPEND) CAN ALSO BUY:
  - 1x Frag Grenade (to make Rakghouls in Lower Sewers more consistent)
- Exit to Upper City South
- If you already used Alacrity and Strength, Stims: Use Battle Stimulant on MC using the stim hotkey as you leave
- Conditional Shopping: Zelka
- Check the Credit Route section to see if you should shop here; Scoundrels usually will
- To shop with Zelka:
- Run towards statue at the end of the walkway
- Activate Solo Mode
- As Carth, open door to Upper City North
- As MC, talk to Zelka in the medical clinic: 5
Buy at least 4 stims:
3 or 4 Adrenal Alacrity1 Adrenal StaminaAs a Scoundrel, buying Adrenal Stamina gives you an important Vitality buffer for the Sewers, Vulkar Base, and Sith BaseThe fourth Alacrity gives you a backup if MC or Carth dies in a bad place, or saves <1 second in Dantooine Ruins.If you can afford it (>250 Credits), you should buy all 5 stims (4 Alacrity and 1 Stamina)
- Stims: Use one of each stim on MC, Alacrity on Carth
- Swap to Carth and Buffer GP Warp to warp MC
- Swap back to Carth and enter Upper City North
- Swap to MC, QS/QL to fix party following AI
- To skip Zelka:
- Run straight from South Apartments to Upper City North and enter
- Skipping Zelka saves 10-11s, but only if you already used an Alacrity from Spire
- After entering Upper City North, run straight across to enter North Apartments
- Run to the left until Sith soldiers accost you (+2 LSP)
- Swap to Carth and queue Power Blasts on all three Sith soldiers
- Activate Solo Mode
- Swap to MC and run back to the door you entered through
- Swap to Carth and loot all three corpses for Sith Uniform, grenades, and adrenals
- Conditional: If you didn’t already, Stims: Use Adrenal Alacrity on Carth
- All route variations should now have three (or four) stims active on MC and Alacrity active on Carth
- Swap to MC and Buffer GP Warp to warp Carth
- Exit the apartments
- Activate Solo Mode
- Equip Carth: Sith Armor
- Run Carth down street to right until it narrows
- Swap to MC and Buffer GP Warp to warp Carth
- The cutscene to enter the Lower City will play and warp MC there
- Enter the Lower City
Lower City
- Hard Buffer past Vulkar/Bek CS
- Equip Carth: Clothes (or Nothing)
- Enter the Hidden Bek Base, mash the Lookout’s interruption
- Activate Solo Mode
- While MC opens door in front, Carth opens the exit door
- Zaerdra accosts you, then talk to Gadon Thek: 1x10, 3, 2
- Leave to Lower City
- Party: Remove Carth
- Hard Buffer past Canderous CS
- Enter the Undercity
Undercity
- Hard Buffer to skip beggar CS
Scoundrel Level to 3: Save Skills (granted Sneak Attack II)Scout Level to 3: Save Skills, Empathy- Party: Add Carth
- Run towards the gate to trigger the Run, Hendar, Run! CS
- Rakghoul Fight:
- MC should get behind the Rakghoul (for Sneak Attack as Scoundrels) and use Flurry
- Swap to Carth and use Power Blast at close range
- This fight is typically two rounds, but can be three with below average Attack/Damage rolls
- Run towards Sewers until Mission accosts you and agrees to help you
- Party: No change when prompted
- Enter the Lower Sewers
Sewers
The Sewers are one of the riskiest parts of Taris, as MC has to run past a lot of enemies with not a lot of Vitality. Try to keep MC’s health high while in the Sewers and use as many medpacs as needed.
- Open first door, then throw all frag grenades you have to kill the rakghouls
- Throw one each as different party members if you have multiples
- You should always have at least one
- Activate Solo Mode and swap to Carth
- As Carth, go through the right door, run up the path past the Gamorrean and click the first door on right
- While this happens, MC and Mission should finish off any straggling rakghouls
- Swap to MC and click door on left (before the force field)
- Swap to Carth and rescue Zaalbar
- Party: Keep Mission when prompted; DO NOT ADD CARTH
- As MC, activate nearby terminal to have Mission hack the force field
- Enter Upper Sewers
- Optional Strat: Upper Sewers GP Warp
- This strat allows you to bring Carth to the Vulkar Base, but only saves at most 2 seconds. It basically comes down to personal preference whether you’d rather do GP Warps or the alternate strat, Rancor Juke.
- To perform this strat:
- Party: Remove Mission and add Carth
- Activate Solo Mode
- As Carth, open the door behind you to Lower Sewers
- As MC, run through sewers until just past the Minor Gas Mine and just before the Malfunctioning Droid
- Quickly swap to Carth and Buffer GP Warp to teleport MC to end of sewers
- Queue up Flurries on the Vulkar Guards, then swap back to Carth
- We want to eliminate these guards so MC doesn’t die while Carth is running
- Run through sewers to same point as before
- Swap to MC and Buffer GP Warp to teleport Carth to end of sewers
- Optional: If you’re low on health and/or medpacs, you can Return to Hideout and Transit Back to heal here
- If you choose not to use the above strat:
- Party: Remove Mission
- Run through left tunnel, then take right tunnel
- Use medpacs via hotkey as you open doors to keep your health high
- Juke past the rancor and enter the Vulkar Base
- Try to run always at a 90 degree angle from the rancor’s pursuit
- Enter the Vulkar Base
Vulkar Base
- Kill the patrol droid if Carth is present
- You should skip it if MC is alone
- Defense Turret Skip
- Open door to elevator area, stand in doorframe corner near terminal, QS and pause the game
- You can choose to throw 1 Concussion Grenade (Conc) or 2
- 1 Conc is only recommended if Carth is not present
- If you have Carth, throwing 2 Concs is more consistent and not slower
- For solo MC, 1 Conc can be 4s faster, but far riskier; it also gives you at least 2 Concs for Assault Droid
- If you got a random Conc, you should always throw 2 unless you really want to try for that 4s timesave
- For the 2-Conc skip (up to 70.5% chance of success):
- Throw two Concs (use Carth if he is present) at center turret
- If all three turrets are stunned (59.6% chance), take the elevator to the Garage
- If two turrets are stunned (33.9% chance) and MC is alone, you can either QL or run for the elevator
- The last turret has a 30% (as a Scoundrel) or 20% (as a Scout) chance to miss you
- If you are killed, reload the QS from the main menu and try again
- If one or fewer turrets are stunned, QL and try again
- You only have a 9% (or 4%) chance to survive if two turrets are active, and a 2.7% (or 0.8%) chance if all three are active
- For the 1-Conc skip (up to 34.56% chance of success):
- Throw one Conc at the central turret
- If all three turrets are stunned (21.6% chance), take the elevator to the Garage
- If two turrets are stunned (43.2% chance), run for the elevator
- 1 Conc is really only worth it if you’re willing to take this risk
- If one or fewer turrets are stunned, QL and try again or throw a second grenade (see 2-Grenade)
- In the Garage, if Carth is present, Activate Solo Mode
- If Carth is present, have MC kill both Vulkars in central hallway
- You don’t have to kill any Vulkars if you are alone
- As Carth (or as MC if no Carth):
- Take hallway on right and enter last door on right
- Loot Garage Head’s Desk (for keycard) and supplies (for Computer Spikes)
- Swap to MC (or continue as MC if no Carth):
- Continue past the mines, turn left and take last door on left
- Hard Buffer to skip Kandon Ark fight
- Get the swoop accelerator
- Watch out for the frag mine in front of it; you can dodge it, or with at least 10 HP just tank it
- Talk to Kandon Ark: 1,1,1 (-2 DSP)
- This will teleport you outside the Vulkar base
Rescuing Bastila
- Enter Javyar’s Cantina
- Return to Hideout and immediately Transit Back
- This sets the Transit Point, which we will use after rescuing Bastila
- Return to Hidden Bek base
- Talk to Zaerdra and Gadon Thek
- After loading into the Swoop Platform, Hard Buffer to skip the Ithorian convo
- Talk to the Race Coordinator to complete race one
- Do not shift into the top gear for these swoop races; it’s faster by roughly a second to stay in fourth gear!
- Whatever time you get on this race will be beaten by 0.25s by Redros
- Talk to the Race Coordinator to complete race two
- You’ll need to beat Redros’s time on the second race, but your swoop accelerates faster than before
- After talking to the Ithorian but BEFORE Brejik’s convo, Hard Buffer to skip the Brejik fight
- The Ithorian’s convo is only two dialogs, so click twice then immediately start buffering
- Talk to Bastila
- If you miss the previous buffer, you can use Combat Talking to talk to Bastila and skip the Brejik fight
- Mash through the conversation
- Bastila will loot Brejik’s nonexistent corpse, so you still get her lightsaber and Brejik’s equipment
- This takes you back to the apartment hideout
Taris 2
Upper City
- Hard Buffer to skip Carth/Bastila’s conversation
- Exit the apartment
- After loading, use a Map CS Skip to Transit Back into Javyar’s Cantina
- Activate Solo Mode and run MC into the cantina
- Canderous accosts you
- Equip: Mission’s Vibroblade to Zaalbar’s mainhand
- Exit the cantina as Zaalbar
- For the rest of Taris, Save Teleports are the fastest form of movement.
- As Zaalbar, Save Teleport to Upper City North
- In the Upper City, Activate Solo Mode to leave MC at elevator
- Save Teleport Zaalbar to Droid Shop
- Talk to Janice Nall: 2,2,1 (-4 DSP)
- Party: Add T3, Keep Zaalbar when prompted
- Swap to Zaalbar and Deactivate Solo Mode
- Click the elevator and mash the conversation
- This warps the entire party to the elevator and gives you control of the MC
- Swap to T3 and Save Teleport to the Sith Base entrance
- When the fade out ends and the door is fully open, end this with a Hard Buffer
- Stims: Adrenal Strength on Zaalbar
- Enter Sith Base
Sith Base
For most combat in the Sith Base, MC should use Flurry, Zaalbar should use Improved Power Attack, and T3 should use the Shield Disruptor.
You will probably need your first memory reset somewhere in the Sith Base.
- Hard Buffer to skip secretary conversation
- If you miss, the conversation is 3,1
- Kill both patrol droids at the end of the first hallway
- Take right hallway and kill patrol droid
- Defeat Sith soldiers in barracks
- These have higher AC, so T3’s Shield Disruptor is particularly useful here
- Loot footlocker for passcard with T3
- Hard Buffer to skip Assault Droid intro CS
- Assault droid fight:
- Pause and use all remaining Concussion Grenades on Assault Droid
- Whichever party member you buffered with is probably locked into an attack on the Assault Droid, so use the others
- You should always have at least one Concussion Grenade, any more than that were from random drops
- Chance to stun with one is 55%, with two is 79.75%, and with three (highly unlikely) is 90.9%.
- MC attacks Assault Droid with Flurry
- Zaalbar attacks Assault Droid with Improved Power Strike
- T3 can use his Shield Disruptor to take out the Blaster Turrets (two shots each)
- Enter the elevator
- Recommended safety QS in case of death/bad luck
- Sith Governor fight:
- Pause at the start and set up these actions
- MC: Poison Grenade, then Flurry
- Zaalbar: Sonic Grenade, then Improved Power Strike
- T3: Stun Ray x4
- Unpause to begin and keep queueing more of T3’s Stun Rays until the Governor is stunned
- Once the governor is stunned, swap T3 to Shield Disruptors (especially if you get the round-one stun)
- The first disruptor clears out his shield, the rest do 20 damage
- Loot both strongboxes and Sith Governor’s corpse for Launch Codes
- T3 can start to loot these during the fight if the Governor is certain to die
- Use T3 to Save Teleport out of the Sith Base
Escaping Taris
- Save Teleport as T3 to the Lower City and Javyar’s Cantina
- You may need to QS/QL in Lower City to make sure the MC follows sufficiently
- Enter Javyar’s Cantina and talk to Canderous: 2,1
- Party: Add T3, Keep Canderous when prompted
- Watch the Malak/Saul CS
- After loading in Davik’s Estate, Hard Buffer to skip the Davik/Calo convo and fight
- Switch to T3 and Save Teleport through the door on the right, and the next door
- As T3, hack security terminal: 1,2,2,4,3
- As T3, Save Teleport to enter the hangar and reach the Ebon Hawk
- You’ll need to swap back to T3 when you open the hangar door
- Make sure one of the guards dies if you need XP to hit level 5; see Experience Thresholds for details
- Board the Ebon Hawk, then use a Map CS Skip to Return to Ebon Hawk
- This skips the cutscenes between Taris and Dantooine, as well as the fighter skirmish
Dantooine
Jedi Enclave
- Bastila accosts you
- If MC doesn’t have Alacrity active, Stims: Alacrity on MC
- This should only happen if MC died during the Sith Base
- You may not have an Alacrity here if you got a Spire Alacrity but no others
- Conditional Shopping: Crattis Yurkal
- Check the Credit Route section to see if you should shop here; Scouts usually will
- To shop with Crattis Yurkal:
- Run forward until you reach the top of the ramp
- Activate Solo Mode and swap to T3
- As T3, click the door to the shop on the right
- Swap back to MC and run down the first ramp until you make the right turn
- Swap back to T3, use Default Action to talk to Crattis Yurkal, then immediately swap back to MC
- This keeps MC on the ramp while shopping
BUY: 3x Adrenal Alacrity- As MC, continue running down the ramp
- To skip Crattis Yurkal:
- Run forward down the ramp
- Hard Buffer to skip Belaya’s conversation
- Open Buffer into the council conversation
- This lets you skip the first text faster than usual, saving a few seconds
- Press the stim hotkey before the dream CS to Stims: Use Adrenal Alacrity on MC
- You should always have an Alacrity here now
- Carth accosts you
- Party: No change when prompted
- Equip: Clothes (or Nothing) on MC
- Open Buffer into the council conversation
- Swap to T3 as the buffer ends
- IMMEDIATELY AFTER this conversation, Hard Buffer to skip training montage
- The council conversation is seven 1s; I count those seven, then click twice
- As Master Vrook says, “I can only hope you prove up to the task…”, click to skip the text and IMMEDIATELY AFTER, start buffering
- If you get the QS, but fail the load, kill the program, reopen, and reload the save
- If you miss the QS, it’s faster to kill the program and try again (the previous Open Buffer acts as a safety save)
- Swap to T3 or Canderous and talk to Master Zhar: 1,1
- Swap to MC and talk to Master Zhar again: 1,1,6,3,2,6,4
- Swap to the same party member as before and talk to Master Dorak to become a Jedi Guardian
Level to 4: Strength to 19, Save Skills, Improved Two-Weapon Fighting, Affect Mind and Stun DroidLevel to 5: Save Skills, Burst of SpeedLevel to 6: Persuade to 9, TI to 9, Improved Flurry, Force Valor
- From here, you can take each level up as soon as possible; they’re listed where they are most likely to occur
- Force: Cast Burst of Speed
- Swap to the same party member as before and talk to Master Zhar to construct a lightsaber
- Party: Remove T3 and Canderous
- Talk to Master Zhar once more
- Talk to droid and exit enclave
- Force: Cast Burst of Speed as you exit for Duration Glitch
Dantooine Savannah
For Dantooine and Manaan, Burst of Speed and Force Jump are the fastest forms of movement. Try to Force Jump wherever possible and always keep Burst of Speed active.
- Soft Buffer to skip Jon’s conversation
- Soft Buffer to skip kath hound spawn
- Run/Force Jump to closer entrance to Matale Grounds
- Run through Matale Grounds to Grove
- Run left, then Soft Buffer to skip Bolook’s murder mystery
- As you run through the trees, try to Force Jump to a (Horned) Kath Hound
- Soft Buffer to skip the Juhani fight
- Talk to Juhani to redeem her
- Return to Ebon Hawk (RtEH)
- Talk to Master Zhar, then Master Vandar
- Party: No change when prompted, then Remove Bastila after convo
- Transit Back to Grove and run/Force Jump to Matale Grounds
- Loot Casus Sandral’s corpse in Matale Grounds
- This is the one surrounded by three Kath Hounds ahead and to the right
- Run/Force Jump to Courtyard
- As you approach the ruins, hug the right wall to skip a short CS
- Enter the Ruins
Ancient Ruins
- Party: Add Carth, Keep Bastila when prompted
- Soft Buffer to skip ancient droid conversation
- Activate Solo Mode and do the following actions simultaneously:
- As MC:
- Open right hand door
- Force Jump to guardian droid
- Hack the console: 3,5,3,3,3,4
- As Bastila:
- Force: Cast Burst of Speed
- Open left hand door
- Run through and loot droid wreckage
- Hack the console through the left door: 3,5,3,1,1,3
- As Carth:
- Move in front of middle door
- Stims: Use Adrenal Alacrity
- Use this stim only if you have at least 2 remaining beforehand
- We need one Alacrity for Manaan’s underwater sections
- Once both consoles are hacked, swap to Carth and Deactivate Solo Mode
- As Carth, move forward through both doors
- Soft Buffer to skip short CS
- The timing on this is tricky; open the door, wait a second, then start buffering
- If done right, MC will end up in front of the Star Map without having to watch the CS
- If the timing is off, MC will stay in front of the console they hacked and you’ll have to run to the Star Map
- Buffer towards the Star Map to JMT the Star Map CS
- Loot Nemo’s corpse for Robe and Sigil crystal
- Exit Ruins
- If one of your party members doesn’t follow, use a GP Warp to get them out quickly
Jedi Enclave
- Return to Ebon Hawk and speak with the Council
- Transit Back and Return to Ebon Hawk to board it
- Fly to Manaan
Manaan
Ahto City
- Soft Buffer to skip the Selkath announcement after the first door
- Soft Buffer to skip Sith/Republic soldier conversation after the second door
- These two buffers can be combined into one if you’re comfortable opening the second door while buffering
- Conditional Shopping: Selkath Merchant
- Check the Credit Route section to see if you should shop here
- To shop with Selkath Merchant:
- Talk to Selkath Merchant: 3
BUY: 1x Adrenal Alacrity- Open the door near the merchant and keep running
- To skip Selkath Merchant:
- Run past him and open the door
- Exit to West Central Ahto City
- Talk to Port Authority: 1,3
- Open the door to East Central but don’t enter yet
- Party: Add Bastila just before entering East Central
- Swap to Bastila and Force: Cast Burst of Speed
- Swap to MC and enter East Central Ahto City
- East Central Micro with Bastila (see this video):
- Soft Buffer to skip Sith/Republic soldier conversation again
- Run forward towards the embassy until the Republic soldier or Security Droid at the end of the fountain are targetable
- Activate Solo Mode and click the soldier/droid
- Swap to Bastila, turn right, and run forward until the door is in range and click it
- Swap to MC and run forward until the Embassy Door is in range and click it
- Swap to Bastila and run forward down the hall for about a second
- Swap to MC and run forward to click on Roland Wann
- Swap to Bastila and run forward until the door to Ahto East is in range and click it
- Swap to MC and talk to Roland Wann: 3, 1x8
- Enter the embassy and talk to the interrogator: 1x7,2,4,2,4,3,3
- Swap to Bastila and GP Warp MC to the Ahto East load zone
- Enter Ahto East as MC
- Force: Burst of Speed on MC
- QS/QL to fix party following AI
- Open the first door and Soft Buffer to skip rude Sith lady
- Take door on the left at the end and talk to the Sith Diplomat: 3,1
- Enter the Sith Base
Sith Base
- Force Skip to skip security fight
- Activate Solo Mode; open front door as Bastila
- As MC, go through door behind secretary, then turn left twice
- Loot data module from broken droid
- Swap to Bastila and Buffer GP Warp to warp MC to entrance
- Exit Sith Base
- Map CS Skip to skip the arrest CS
- Transit Back and run back to Republic Embassy
- Talk to Roland Wann
- Party: Add Zaalbar and Juhani
- This gives important extra XP from patrol droids in Hrakert Station.
- Take submersible to Hrakert Rift
Hrakert Rift
- Soft Buffer to skip the mercenary accosting you
- This buffer is most easily done by clicking on the door, then starting to buffer
- Loot Equipment Pack for Credits and Thermal Detonator
- Take first door on right
- Take door next to second droid, then go straight through several doors
- Get Environment Suit from floor
- Loot footlocker in next room for Sonic Emitter
- At the airlock, Stims/Force: Cast Burst of Speed, Use Basic Adrenal Alacrity on MC
- Exit to Sea Floor
- Survivor accosts you once
- Sonic Buffer (with Sonic Emitter) to skip survivor’s death scene
- Kill Firaxan sharks while walking to the left door to Kolto Control
- It is faster to go into the inventory menu, use the Sonic Emitter, and exit the menu; this skips the animation of the Sonic Emitter
- Once inside, Force: Cast Burst of Speed
Auto-Level to 7- Loot the first footlocker for 4 Computer Spikes
- Speak with scientists twice through force field
- Mash default action during the first conversation to immediately start the second and skip being depressurized
- Immediately after the second conversation, Soft Buffer to skip the long third conversation
- Loot the footlocker in the corner of the next room for 2 Computer Spikes
- Exit to Hrakert Rift
- Both Speed and Alacrity should still be active; if Speed wore off, recast it
- Kill two Firaxan Sharks with the emitter
- Sonic Buffer (with Emitter) to get past Firaxan shark death trigger
- Star Map: Manaan (watch the whole CS)
- Sonic Buffer (with Emitter) to skip death trigger when leaving
- Reenter station through righthand door
- Return to surface with the submersible, return to Ebon Hawk and board
- While running to the submersible, you can hover your mouse over your character portrait to check your XP; see Experience Thresholds for details
- Soft Buffer to skip Zaalbar’s stowaway interruption
- There are two triggers for this; one at the entrance to the hawk, and one at the start of the hallway to the cockpit
- If you buffer the first trigger, the second one goes away; but if you Save Teleport over it instead, you’ll need to buffer the second trigger also
- Fly to Tatooine with a Map CS Skip
Tatooine
Note: For Tatooine and almost every planet afterwards, Save Teleports are the most efficient form of movement. These are more effective if you do NOT have Force Speed or Alacrity active, so try to keep it off as much as possible. Force Skips can still be done by casting Force Speed twice to cancel it.
Anchorhead and Dune Sea
You will probably need your second memory reset somewhere in Anchorhead or the Dune Sea.
- Force Skip the Czerka Officer
- You’ll end up doing this skip three times; or you can do the conversation: 1,1,5
- Soft Buffer to skip the Gizka conversation
- Exit to Anchorhead and Enter Czerka Office
- Force Skip the Duros conversation
- Talk to the Czerka Officer: 1,1,1,3,2
- Exit the office
- Soft Buffer or Save Teleport to skip the Dark Jedi fight
- Speak to the Gate Guard to exit to Dune Sea
- Soft Buffer to skip the angry wife conversation
- Save Teleport towards the Eastern Dune Sea (left side of sandcrawler)
- Save Teleport past Eastern Dune Sea loading zone
- This skips a trigger that prevents you from entering without a map
- A Soft Buffer will also cancel the trigger preventing you from entering the loading zone
- Party: Add Bastila and T3
- If you’re doing the 2-frame QS version of Krayt Skip, only add Bastila
- We use Bastila because she still has Speed active from Manaan
- We use T3 because he doesn’t have a banter conversation with Bastila
- Enter loading zone from the back to enter Eastern Dune Sea
Krayt Dragon Skip
- Method 1: Conversation Overlay
- This is the recommended method. With practice, this method is consistent, but it is roughly 10 seconds slower than a first try 2-frame QS (see Method 2 below)
- This video demonstrates the Conversation Overlay method at speed.
- To perform Krayt Skip this way:
- Save Teleport/Soft Buffer from entrance all the way into the Krayt Dragon’s cave
- Make sure your party follows you!
- Once in the cave, Activate Solo Mode
- Swap to Bastila and click the rubble to the left of the Krayt Dragon
- Swap to MC and Soft Buffer just out of the cave
- Swap to Bastila and loot the rubble for the Opila Crystal
- Position Bastila in front of the Krayt Dragon in a precise location
- Swap to T3 and position it in this precise location
- Here’s a look at the general spot
- This position puts T3 almost as far away from the Dragon as possible while still being able to speak to Bastila
- Position MC directly behind T3 and before where the sand texture changes
- Begin the Conversation Overlay:
- MC talks to T3; QS and use a mine to cancel movement
- QL and immediately pause. MC should be running towards T3.
- Let MC get just inside the last sand texture before the mouth of the cave and pause again
- This timing will have T3 get temporarily stuck on the MC while running to Bastila, shown in this diagram
- Swap to T3 and talk to Bastila while still paused
- Swap to MC and unpause. T3 will begin moving towards Bastila and the Krayt Dragon CS will start.
- The Conversation Overlay should cancel the Krayt CS after it starts walking but before your party is killed.
- It is possible for T3 to get stuck on MC for too long and the party to be killed; this typically happens if T3 is too far left
- If this happens, click OK, load the QS, and adjust T3’s position before trying again
- It is also possible for T3 to reach Bastila before the Krayt Dragon moves forward, typically if T3 is too far left or MC was too far away
- If this happens, QL and adjust either T3 or MC’s positioning while trying again
- After the interruption, finish Bastila’s conversation: 2
- Deactivate Solo Mode, swap to Bastila and talk to the Krayt Dragon
- This fixes the dragon in place and you can now move past the right side to the Star Map
- Method 2: 2-Frame Quick Save
- This method relies on a 2-frame window between the end of the Krayt Dragon cutscene and the pop-up that kills your party. While faster than the other method due to easier setup, it is extremely inconsistent and only recommended for the insane or the very advanced.
- To perform Krayt Skip this way:
- Save Teleport/Soft Buffer from entrance all the way into the Krayt Dragon’s cave
- End this Soft Buffer by actually casting Burst of Speed
- Make sure Bastila follows you!
- Once in the cave, Activate Solo Mode
- As MC, loot the rubble to the left of the dragon for Opila Crystal
- As MC, turn and click the rubble on the opposite side of the cave near its mouth
- Swap to Bastila and position her in front of the Krayt Dragon
- This is the same position as depicted above
- Swap to MC and run up to the mouth of the cave, then QS
- Run forward to start the cutscene and watch it
- QS during the 2-frame window following the CS but before the death pop-up
- This is a 2-frame window at 60 FPS. Good luck!
- If you miss it, click OK, load the QS, and run forward to try again
- Each try costs 14.5 seconds; 2nd try is slightly slower than Method 1, while anything else loses significant time
- If you succeed, click OK and load the QS
- Deactivate Solo Mode, swap to Bastila and talk to the Krayt Dragon to fix it in place
Leaving Tatooine
- Loot the chewed Twi’lek corpse for the Nerve Amplifier Belt
- If you can’t loot this corpse, Bastila’s position was slightly off
- You can buy a Nerve Amplifier Belt from Mic’Tunan’Jus Orgu in the Tatooine Docking Bay, but it changes your shopping on Korriban (see below)
- Use JMT to skip the Star Map CS
Level to 8: Strength to 21, Persuade to 10, Disable Droid- Save Teleport back to the front of the Krayt Dragon
- Make sure your party is following you
- Hard Buffer to skip Calo Nord fight (and possibly Krayt Death trigger)
- Exit to Dune Sea
- Return to the Ebon Hawk and board
- Equip MC:
- Verpine Headband
- Strength Gauntlets
- Nerve Amplifier Belt
- Jedi Knight Robe
- Double-Bladed Lightsaber
- Upgrade Double Lightsaber: To Sigil and Opila
- Fly to Korriban with two Map CS Skips
Korriban
Dreshdae
- Port Authority accosts you: 1,1,3,2
- Save Teleport or Soft Buffer to skip Shaardan’s conversation
- Soft Buffer to skip Lashowe’s conversation
- If you are a Female MC and miss this buffer, either QL to try again or use the convo: 1,4,1,1,1
- For Female MC, Lashowe’s required Persuade check is Hard (and has 25% chance of failure) unless you skip this or tell her a joke
- For Male MC, we use a different Persuade check that’s Easy, so if you miss the buffer you can mash the convo
- Talk to the Czerka Shopkeeper
SHOPPING: Czerka Shop
- SELL ALL EXCEPT:
  - Advanced Medpacs
  - Computer Spikes
  - All Mines
- BUY:
  - 6-8x Life Support Packs (stay above 2500 Credits)
  - 5x Echani Battle Stim
  - 5x Hyper Adrenal Alacrity, Strength, and Stamina
  - If you had to buy the Nerve Amplifier Belt, buy instead 4x Echani, 3x Hyper Alacrity, 4x Hyper Strength (no Stamina)
- End: <150 Credits
- Leave Dreshdae
- Talk to guard outside academy
- Reenter Dreshdae
- Talk to Yuthura: 3,4,2,3,1 (-2 DSP)
- You should never fail this Persuade check anymore
Gaining Prestige
You will probably need your third memory reset somewhere in Valley of the Dark Lords.
- Force Skip to delay Uthar conversation
- Talk to Lashowe
- As a Male MC: 1x7, 3, 4
- As a Female MC: 1x7, 2, 1, 4
- Speak with Uthar Wynn and students
- Yuthura talks to you: 1,1,1,1,4,2,7,5
- Talk to Kel Algwinn
- Open the door to Valley of the Dark Lords but don’t enter yet
- Stims/Force: Hyper Adrenal Strength, Hyper Adrenal Stamina, and Echani Battle Stimulant on MC, Cast Force Valor
- Exit to Valley of the Dark Lords
- Map CS Skip to Return to Ebon Hawk, then Transit Back
- This skips the Darth Bandon fight; you can also Hard Buffer instead
- Run/Save Teleport over to Lashowe (can Force Jump to Shyracks)
- Optional: Party: Add Juhani and Zaalbar
- This is mostly useful for distracting the tukatas/Lashowe to get Sneak Attacks in as a Scoundrel
- This can be the difference between one-round and two-round tukatas, or even (if lucky) a one-round Lashowe
- Kill the Tukatas
- Lashowe confronts you: 2,3
- Kill Lashowe and loot her corpse for Holocron
- Party: Remove Juhani and Zaalbar if you added them
- Save Teleport back through the Valley to the Sith Academy
- Save Teleport up the ramp to talk to Uthar Wynn: 3,1,4,3,2,3,4,4,X,4,2,2,4
- The X is a variable answer based on one of three questions he asks after the Sith Code
- Answers are:
- There is nothing worse than love: 2. False
- Victory by any means is desirable: 2. False
- It is our passion that fuels the Force: 1. True
- You should be level 9 after this conversation; see Experience Thresholds for details
Level to 9: Persuade to 11, Master Two-Weapon, Knight Speed- Run backwards slightly and click on Uthar to use JMT on his conversation
- You’ll need to mash through 3,1 and then several clicks so that he congratulates you on getting enough prestige before the mine cancels the convo
- This skips being sent back to your room, saving around 10 seconds
- Talk to Uthar again: 3
Tomb of Naga Sadow
- Uthar instructs you in the tomb: 4
- Save Teleport at first door to skip Wraid spawn
- Take right fork and open door
- Soft Buffer to skip door closing CS
- Open door and loot Pillar of Ice
- On way out, loot Skeletal Human Remains for Solari crystal
- Return to central branch and freeze acid pool
- Open door to map room, then Force: Cast Burst of (or Knight) Speed
- Hard Buffer to skip Star Map CS
- This is a tricky buffer because the trigger for the CS is very small; we use Speed to shorten our teleport distance
- Run backwards until you hit the rubble in the middle of the path, then buffer forward from there
- You should hear the Star Map begin to open if you hit the trigger
- As an alternative, you can deactivate V-Sync for the buffer, then reactivate it afterwards
- Loot Sith Statue for Sith Lightsaber
- Force: Cast Force Valor and Knight Speed
- Uthar accosts you: 5,1
- Kill Uthar and Yuthura accosts you: 1
- Remember to swap combat actions to Flurry before attacking Uthar!
- Defeat Yuthura and spare her: 3,2
- Sparing her prevents the academy from going hostile and preserves our alignment for the Solari crystal later
- Save Teleport back to the academy
- After entering the academy, immediately leave and Return to Ebon Hawk to board
- Soft Buffer at the entry to skip Zaalbar’s stowaway interruption
- Fly to Kashyyyk (no Map CS Skip)
The Leviathan
Detention
- Carth whines at you on the Ebon Hawk: 1,1,1,2
- Saul Karath’s interrogation scene
- IMMEDIATELY AFTER, Hard Buffer to skip Mission’s prison break CS
- As Mission:
- Save Teleport and take door at end of left hallway
- Loot footlocker for Sith Passcard AND 3 Computer Spikes
- Save Teleport all the way to the Detention Center
- Activate the terminal
- As MC, loot rightmost locker
- Equip MC:
- Verpine Headband
- Strength Gauntlets
- Jedi Knight Robe
- Nerve Amplifier Belt
- Double-Bladed Lightsaber
- Optional: Use a Menu Item Duplication to dupe the Nerve Amplifier Belt onto Carth
- This prevents Carth from being stunned on the Leviathan Bridge, making the escape from the Bridge more consistent
- Save Teleport to the elevator to Bridge: 2
Bridge
For the rest of the Leviathan, you have to keep Carth and Bastila close to you in order to go through loading zones. Do your best to make sure they don’t wander off, as that can and will lose you a lot of time. It can help to QS/QL here, and you may wish to use Speed for movement for consistentcy.
You will probably need your fourth memory reset somewhere just before or just after Saul Karath Skip.
- Turn right and kill guard
- It’s possible to run past this guard without killing him
- However, there’s a small chance he’ll shoot at Carth/Bastila and aggro them
- Turn left at the end of the hall; make sure Carth and Bastila are following you here
- Take first hallway on left, then immediately bash down armory door on the right
- If you’re too slow, the Sith Guard here will aggro Carth and/or Bastila
- Get the Space Suits from the floor
- Bash down the door across the armory
- QS before door across the hall
- Run through next room, bash down door, and enter bridge storage
- If you get stunned or your party wanders off, QL and retry
- Hard Buffer to skip the spacewalk
- Click the door, immediately QS once, then QL
- Done perfectly, you can run through the space section without any trouble
- If that fails, the door may look open but be closed and solid (if your QS was slightly late)
- If that happens, QS/QL and you can open the door without donning the suit
- Once on the other side, Activate Solo Mode
- As Carth and Bastila, Save Teleport to the door on the right
- Have the first party member open that door
- The goal is to have them stay close enough to the exit while you do Saul Karath skip
- Swap back to MC and Save Teleport up to bridge door
- Saul Karath Skip:
- Optional: Hard Save for safety; it is possible to softlock here
- This trick is a Hard Buffer, but the timing is quite precise
- Open Bridge Door and QS twice, then load immediately
- If the trick works, the bridge door will be open, the fight will not start, and Bastila and Carth will be in your party
- If Bastila and Carth are not in your party, you’ve softlocked
- If your last QS was too late, your game will crash when you load
- As soon as you load from the buffer, Medpacs: Carth and Bastila via hotkey
- This uses a Life Support Pack on each and helps ensure they stay alive until you reach the exit
- Save Teleport to hack bridge terminal: 1,2
- Save Teleport straight down the ramp to the exit
- If you can’t go through, swap to Carth/Bastila and Save Teleport them towards the exit until you can leave
- If Carth or Bastila died too far from the exit, you’ll need to kill all five Sith Soldiers to leave
- Back on the Command Deck, Medpacs: Everyone as needed
- Force: Cast Knight Speed on MC
- Kill the Sith guard nearby to the left
- Swap to Bastila (or Carth) and QS/QL to get party to follow
- Take left path and Save Teleports around outside back to elevator
- With quick, precise Save Teleports, it’s possible to skip killing the two guards right outside the elevator
- If either Carth or Bastila aggros on them, you’ll likely have to kill them
- Or you can use Solo Mode and Save Teleports to try to get everyone into the elevator
- Take the elevator to the Hangar: 3
Hangar
- Activate Solo Mode
- Run/Save Teleport straight through to the Darth Malak CS
- Stims/Force: Cast Knight Speed and Force Valor, Hyper Stim Suite on MC
- Hyper Stim Suite is Hyper Alacrity, Hyper Strength, Hyper Stamina, and Echani Battle Stim
- Darth Malak accosts you
- Plot twist!
- Darth Malak accosts you again: 1,1,1,1,2,1,4,1
- Darth Malak fight:
- As a Scoundrel, use Flurry once next to or slightly behind him to get Sneak Attacks off
- Immediately after Malak goes non-hostile but before the CS, use the Sonic Emitter
- This breaks the next cutscene in such a way that MC is teleported to a waypoint that is slightly closer to the second phase, saving 3-4s
- Run/Save Teleport through blast doors after Malak flees
- Force: Cast Knight Speed and Force Valor, Hyper Stim Suite on MC
- If you had to buy fewer stims on Korriban, don’t use any stims here
- Darth Malak fight, part two
- Bastila sacrifices herself, sort of
- Leave with Carth through blast doors on left
- Shoot down the Sith fighters
- Talk to the party on the ship
- Exit the ship after the sleeping CS
Kashyyyk
The Great Walkway
- Janos Wertka accosts you
- You can Force Skip this, but you’ll have to do it again twice later
- Soft Buffer from lower level to door to Great Walkway
- This skips a conversation with Ziagrom and the Czerka guard at the end
- Party: Add T3
- Exit to Great Walkway
- Activate Solo Mode to leave T3 at landing pad
- Save Teleport to skip Czerka patrol
- If you talk to them the convo is just 5
- Save Teleport along walkway until you reach the Wookiee Guard
- You can also Force Jump where able, but be aware it will sometimes target enemies behind you
- Soft Buffer/Save Teleport past the Wookiee Guard
- This skips a trigger that forces you to visit the Wookiee Village first
- Swap to T3 and Buffer GP Warp the MC to the elevator
- Take elevator to Upper Shadowlands
Upper Shadowlands
- Save Teleport to skip Katarn Spawn
- An easy visual cue is to QS when you reach the hanging vine
- Jolee Bindo greets you
- Continue to the fork, then Activate Solo Mode
- Run/Save Teleport with T3 to Jolee’s House
- With MC, take left path and Save Teleport to Czerka guards
- If the captain speaks to you, convo is 1,4; you can also try to Soft Buffer this
- Talk to first Czerka guard: 1,1,3,1,2
- Hack the sonic emitter next to that guard
- Talk to second Czerka guard: 1,1,2
- Hack the sonic emitter next to that guard
- IMMEDIATELY AFTER, Soft Buffer to skip the terentatek CS
- Swap to T3 and speak with Jolee from a distance, then swap back to MC before the convo: 1,1,1,1,2,3,1,1,1,1,1
- Party: Keep Jolee when prompted
- If you didn’t manage to swap to MC before the convo, add T3 again
- As MC (or swap to T3) and Save Teleport to Force Field: 1,2
Lower Shadowlands
- Activate Solo Mode
- Soft Buffer or Save Teleport to skip the Mandalorian CS
- Save Teleport to skip a kinrath spawn
- If you miss it, you can either use the GP Warp backup below, or kill the kinrath
- Try to QS a few steps after the hanging vine
- If the kinrath are unspawned or dead, deactivate Solo Mode near the Star Map Computer
- Use JMT on the Star Map Computer: 2
- You need to spam through the conversation so that the Star Map starts to open before the mine cancels the convo
- You should now be out of mines
- Run/Save Teleport back to Upper Shadowlands
- If needed, use a GP Warp to warp your party to the exit
- This can either be timed from a distance, or you can disable V-Sync to make it easier
Leaving Kashyyyk
You will probably need your fifth memory reset somewhere while leaving Kashyyyk.
- Activate Solo Mode
- Run/Save Teleport to Gorwooken
- Speak to Gorwooken to reach the Great Walkway
- Run/Save Teleport to Wookiee Village
- Wookiee Guard accosts you: 1,1,1
- Immediately after loading, Map CS Skip to Return to Ebon Hawk and board
- Force Skip Janos Wertka’s convo after loading if you did before
- Fly to Star Forge System (Lehon) with a Map CS Skip
- Force Skip Janos Wertka’s convo after the Map CS Skip if you did before
- Reboard Ebon Hawk and fly to Lehon again (no Map CS Skip)
- Sometimes you’ll have to shoot down some Sith fighters; whether or not this triggers is sadly random
Lehon
Save Teleports are again very useful for movement on Lehon. Be careful not to overuse them, as we want to avoid game crashes.
Beaches
- Run/Save Teleport to Temple Exterior
- Run/Save Teleport through Temple Exterior to South Beach
- Return to Ebon Hawk and Run/Save Teleport to North Beach
- Rakatan Warriors accost you
- Speak with The One: 1,1,1,1,1,4,4
- Run/Save Teleport straight to Elder Warrior without entering combat and talk to him
- If you enter combat accidentally, use Combat Talking to talk to the Elder Warrior
Level to 10: Persuade to 12, Master Flurry, Knight Valor- Loot Ship Parts from opposite cell
- Run/Save Teleport out of Rakatan Compound
- Force Skip short walking cutscene outside
- Run/Save Teleport to Central Beach
- Transit Back to South Beach
- Soft Buffer to skip gizka death scene
- Enter Elder Rakatan Compound
- Speak with Rakatan Elders
- Run/Save Teleport back to Temple Exterior
- Begin the Rakatan ritual to enter the temple
- After the CS ends but before the load into the STUNT module, QS
- You should mash QS as the party runs towards the temple
- Kill the program with either ALT+F4 or Task Manager, then reload the QS
- This skips the Malak cutscene and acts as the sixth and final memory clear
- Party: Remove Juhani, Add Canderous
- This enables a quicker escape to the Ebon Hawk later
- Enter the Temple
Ancient Temple
- Activate Solo Mode; make sure Jolee and Canderous stay right near the entrance
- Run/Save Teleport to temple basement in back
- Stims/Force: Hyper Stim Suite on MC, Cast Knight Speed and Knight Valor
- Kill both guard droids in basement
- Solve floor puzzle with this H-shaped path
- Speak to basement computer: 1,1,2,1,2
- Return to main floor
- Activate Solo Mode
- Optional: Deactivate V-Sync to make the next GP Warp easier
- Save Teleport MC once up the ramp, then swap party members twice
- Buffer GP Warp by hitting the load zone, then swapping to the MC
- Enter Temple Summit
- Re-enable V-Sync if you disabled it before
- Talk to and defeat Darth Waifu
- You can try to get behind her for Sneak Attacks as a Scoundrel, but even with that this fight is nearly always 2 rounds
- Choose to remain true to the light side
- This is faster than the Dark Side ending; no party members on Star Forge to get in the way
- Hack computer terminal to lower disruptor field
- Run/Save Teleport back to the Main Floor
- Run/Save Teleport out of the temple and back to Central Beach
- Make sure your party follows you in Temple Exterior; if you spend too long there, a STUNT CS will trigger!
- As soon as you reach the Central Beach, swap to Canderous and board the nearby Ebon Hawk
- Canderous teleports to be there for the CS outside the Ebon Hawk, but stays in your party
- Upgrade Double-Bladed Lightsaber: Replace Opila with Solari
- Repair the hyperdrive on the Ebon Hawk
- Fly to the Star Forge
The Star Forge
Note: The game has now deleted data so that your Save Teleports are greatly weakened. It’s fastest to use Knight Speed and Force Jump for movement on the Star Forge.
Deck 1
- Exit the Ebon Hawk
- Force Skip Jedi vs. Sith CS
- Soft Buffer to skip Assault Droid CS and spawn
- Go right, then left
- To get past the two frozen assault droids, click on the distant door and watch the wonders of KotOR pathing
- Hard Buffer past Jedi vs. Sith CS
- Force/Stims: Cast Knight Valor, Use Hyper Stim Suite as you enter Deck 2
Deck 2
- Hard Buffer past fight trigger
- Optional: Save Teleport past the enemy spawn trigger (Indy Skip)
- This skips the trigger that spawns all the enemies in the hallways ahead of you
- No enemies means you’re much less likely to be debilitated by an enemy Force Power
- However, it also means you have no enemies to Force Jump to, so this is slightly slower than the best case scenario
- Take left path, then right, then turn left
- Hack computer terminal: 1,1,5
- Return and take elevator to Command Deck
Command Deck
- Immediately after loading, Hard Buffer to skip Bastila/Malak CS
- Run/Force Jump through first door on left, then two more doors
- Ensure all six buffs are active
- Open Buffer into the triple Dark Jedi fight
- DO NOT Soft Buffer; this will softlock the game
- This Open Buffer messes with the Dark Jedi AI so they won’t attack you unless you attack them first
- Defeat three Dark Jedi to unseal the door
- Kill the center one first, then as a Scoundrel, try to get behind the other two before attacking them for Sneak Attacks
Auto-Level to 11
- If you don’t hit this here, you’ll need to kill Bastila to hit level 11 (see below).
- Not hitting level 11 can lose up to a minute on the Malak fight due to no Stasis strat and worse combat rolls.
- Open the door to Bastila’s chamber, then use the Sonic Emitter to skip the first phase
- Start using the Emitter about 1-1.5s after the door starts opening
- Run left to Bastila and talk to her
- Spam default action during this convo to immediately talk to Bastila and skip the second phase as well
- If you fail to skip the second phase, just hit her with the saber to get to the next conversation
- Bastila talks to you, then defeat her final phase
- Don’t mash default action during this cutscene, as skipping the next phase causes a softlock!
- If your Knight Speed and/or Valor wore off here, it’s not worth casting them again until after the fight
- The defeated Bastila talks to you one last time
- If you need to kill Bastila to reach level 11:
- As a Male MC: 1,1,2,2,3,2
- As a Female MC: 1,1,2,2,2,2
- After she goes hostile, kill her with Flurry
- If you already have enough XP, mash the conversation; both Male and Female MCs should always have enough Persuade to spare her
- After the load but before the cutscene on the Harbinger, activate a Map CS Skip:
- Party: Add Jolee and Bastila
- Close the menu and watch the cutscene
- Force: Cast Knight Speed
- Run through door on right
- As you approach the next door, Soft Buffer to skip the Darth Malak conversation
- End this Soft Buffer by actually casting Knight Valor
- Stims: Hyper-Adrenal Alacrity on Bastila
- This keeps Speed active on Bastila during the Malak fight
- To get to the elevator, run all party members towards the corner near the left Jedi and switch party leaders
- One of your characters will end up next to the elevator door; take it to the Viewing Platform
Darth Malak Fight
If Bastila and Jolee are not level 10, you won’t be able to use the Stasis strat, as they only learn Stasis at Auto-Level 10. This XP threshold is slightly higher than MC hitting level 11, but usually if you hit level 11 you can use this strat.
This video shows the Stasis strats described below.
- If necessary, swap to MC and QS/QL to keep your party following you
- Phase One:
- Optional: QS at the end of the walkway leading to Malak
- Malak convo: 2
- IMMEDIATELY after his weapon flourish CS, pause the game.
- If Malak already has a blue aura around him (Force Immunity):
- He will always resist Stasis, so just use Flurry on him with MC
- Try to distract him with Jolee/Bastila for Sneak Attacks as well
- With no Stasis casts, MC has only a 40% chance to hit Malak, so this is usually 4-6 rounds
- If you have a QS, you can instead load it and retry; but this costs 10 seconds and is usually not worth it
- If Malak hasn’t cast Force Immunity yet:
- Swap to Bastila, Stasis x2 on Malak
- Swap to Jolee, Stasis x2 on Malak
- Swap to MC and swap combat feats to Flurry, then unpause, get behind him, and Flurry x3
- Swap to Bastila and queue Burst of Speed
- The Stasis casts will always be saved, but each one slows Malak, reducing his AC by 4 each for a total of -16
- Using Stasis in this way makes the first phase a consistent 2-3 round fight
- As Malak runs to absorb the first Dead Jedi, run Bastila towards the opposite side to this point (pic coming)
- Phase Two, The Jedi Popsicles:
- Mash the cutscene, then immediately pause
- If you didn’t get the Stasis strat in Phase 1, Malak’s Force Immunity is still active, so:
- Swap to MC and queue Flurry x3 on Malak, then swap to Bastila and unpause
- If you did get the Stasis strat in Phase 1, you can use it again in Phase 2:
- Swap to Jolee and use Stasis x1 on Malak
- Swap to MC and queue Stasis x1, then Basic Attack x3
- To make Malak less likely to heal twice, can do Stasis, Basic Attack x2, Life Support Pack instead
- Swap to Bastila and unpause
- As Bastila, use Disable Droid on the four Dead Jedi on her side
- Immediately swap to MC and use Disable Droid on the three remaining Dead Jedi on the opposite side
- Using MC prevents Malak from losing too much health, which would trigger another absorption CS
- If you’re using the Stasis strat, you need to be quick to prevent Malak from healing again
- Force: Recast Knight Speed and Knight Valor if needed
- Malak will often, but not always, use Force Breach to cancel your buffs
- Prioritize Knight Valor over Knight Speed if you don’t have enough Force points
- Kill Malak with Flurry once and for all
- Bastila and Jolee can use Stasis on Malak if he doesn’t have Force Immunity up, but this is rare
- In any case, Bastila and Jolee can distract Malak to enable Sneak Attacks for Scoundrels
- This last part is RNG heavy, as you only have a 40% chance to hit Malak
Version History
v5.7 (October 2024)
- Add new Lower Sewers strat that is faster and easier than the old GP Warp strat
- Removed info about the level 5 XP threshold since the above strat ensures you will always hit it
- Updated info about Larrim’s shopping trip and Spire loot to reflect that frags aren’t as important
v5.6 (October 2024)
- Updated Zelka’s shopping trip to make the Stamina purchase the preferred one
- Added notes to Turret Skip to reflect Scout’s lower defense
- Added notes through the run to reflect differences for Male vs. Female MC
- Added notes for likely areas to require memory resets
v5.5 (September 2024)
- Add a new Stasis strat for Phase 2 of Star Forge Malak
- Add Save Buffers to skip two Zaalbar conversations on the Ebon
- Add two quick, useful safety strats to Leviathan
- Add GP Warp backup strat to Lower Shadowlands
- Change where Bastila is added on Manaan
- Change how you return to the Sith Academy after killing Lashowe
- Update XP Thresholds to include level 5
- Update Turret Skip with more in-depth strategies
- Update Larrim’s shopping to allow for selling Frag Grenades
- Update strats in the Sewers with better timing info
v5.4 (August 2024)
- Add a video for Krayt Skip via Conversation Overlay
- Add a video for the Bastila micro movement in East Central
- Update info about Adrenal Stamina random loot
v5.3 (August 2024)
- Updated and rewrote some early game shopping and credit route notes
- Added two Sonic Emitter Skips to skip Phase 1 Forge Bastila and a little running on Leviathan
- Updated Krayt Skip with better positioning and party members
- Added additional notes for XP thresholds to hit level 11
- Move the Javyar’s Cantina transit point to after the Vulkar Base
- Miscellaneous minor fixes and corrections
v5.2 (August 2024)
- Added the old Scout Build back in as an option; Scoundrel and Scout builds are on average equal.
- Tweaked the necessary parts of the route to illustrate differences between Scout and Scoundrel.
- Tweaked stim route and shopping to allow for an Alacrity usage on Dantooine.
- Added additional information about random loot on Endar Spire and Larrim’s shopping.
- Miscellaneous minor fixes and corrections.
v5.1 (August 2024)
- Added a strat that always avoids the Rakatan Warriors when leaving Lehon.
- Miscellaneous minor fixes and corrections.
v5.0 (July 2024)
- New build using Scoundrel/TWF/Flurry, as well as Auto-Level Attribute Points.
- Added several new skips using Jedi Mine Trick.
- New consistent Krayt Skip using Conversation Overlay.
- Mostly new credit route, shopping, and stim usage for the new build.
- New streamlined alignment route that places Solari after Lehon.
v4.3 (May 2022)
- Added Zelka back in as an optional shopping trip for beginners or marathons.
- Miscellaneous minor fixes and corrections.
v4.2 (May 2022)
- Separated the Detailed Route into its planetary sections.
- Miscellaneous minor fixes and corrections.
v4.1 (December 2021)
- Route now skips the shopping trip with Zelka.
- Updated stim and credit route.
- Route now uses Carth for the Sewer GP Warps instead of Mission.
- Added an optional strat before the submersible on Manaan.
v4.0 (November 2021)
- Updated the rules to reflect the unbanning of Krayt Skip and Wire Targeting.
- Added Krayt Skip as an optional strategy on Tatooine.
- Removed the Freyyr fight in favor of save teleporting to the Wookiee Village.
- Updated the credit and shopping route to skip the CNS Strength Enhancer and Nerve Enhancement Package.
- Updated the character build to save level 4 for the Jedi class, ensuring earlier combat feats.
- Tweaked the alignment route to save time.
- Other minor additions and updates.
v3.3 (August 2020)
- Updated the credit/stims route.
- Small tweak to the leveling plan.
- Updated the ruleset to ban Wire Targeting.
- Other minor additions and updates.
v3.2 (June 2020)
- Fixed an error with the table in the Leveling Plan
- Added the elevator warp after buying T3
v3.1 (April 2020)
- Updated the ruleset to allow Single Item Duping (but still not Full Inventory Duping)
v3.0 (April 2020)
- Rebranded the category to better reflect its nature
- Updated the ruleset to ban Fast Lane, Hotshots, and Inventory Duping
- Tweaked the character build and alignment route slightly
- Tweaked the credit/shopping route through Dantooine
- Added a few short GP Warps to Taris/Manaan
- Added the optional Sewer GP Warp to Taris
- Miscellaneous small corrections
v2.2 (November 2019)
- Updated the ruleset to include GP Warps.
v2.1 (September 2019)
- Miscellaneous small fixes
v2.0 (June 2019)
- Switched the planet order to Manaan -> Tatooine -> Korriban
- This ensures Level 9 (and Knight Speed) before fighting Uthar and Yuthura
v1.3 (May 2019)
- Moved the Transit Point set on Taris to save ~35 seconds.
- Added more info about the Canderous trick on Lehon
- Fixed a couple miscellaneous mistakes.
v1.2 (March 2019)
- Tweaked Character Build:
- Initial Attributes have 10 Charisma instead of 10 Wisdom
- Force Powers include Knight Valor/Disable Droid instead of Dominate Mind/Drain Life
v1.1 (March 2019)
- Modified strategies for Assault Droid and Sith Governor fights
- Added skip with Canderous on Lehon
v1.0 (March 2019)
- Converted the Beginner’s Guide to this one
- Scout -> Jedi Guardian build with Two-Weapon/Flurry
- Route is a blend of Any% and Glitchless
Closing
If you made it this far, congratulations! Thanks for reading the guide. Please let indykenobi know if you have any comments or questions (best way to contact is via the KotOR Speedrunning Discord).
I’d like to acknowledge glasnonck and thinkshooter, whose runs got me into KotOR speedrunning, as well as glasnonck, sheepmetal, and wurwilf, who all discussed this category before it was implemented.
Just remember, Pazaak is not for everyone.


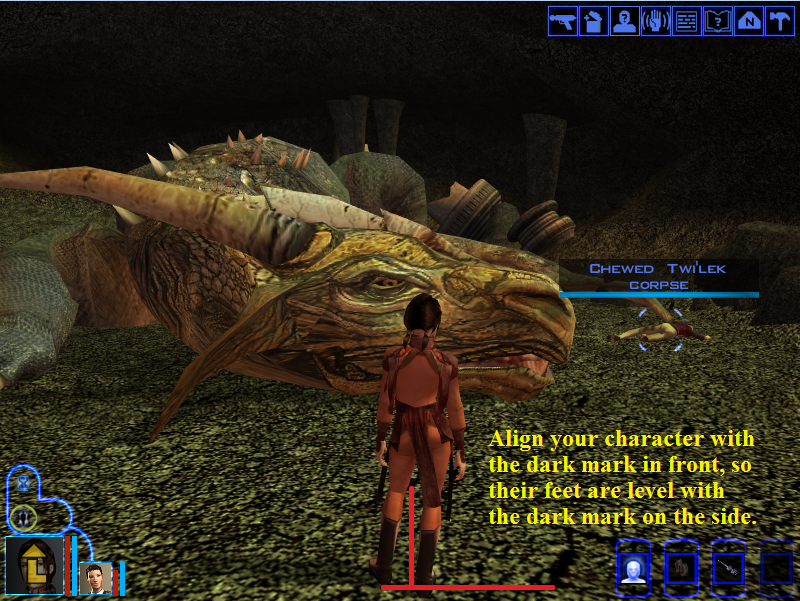
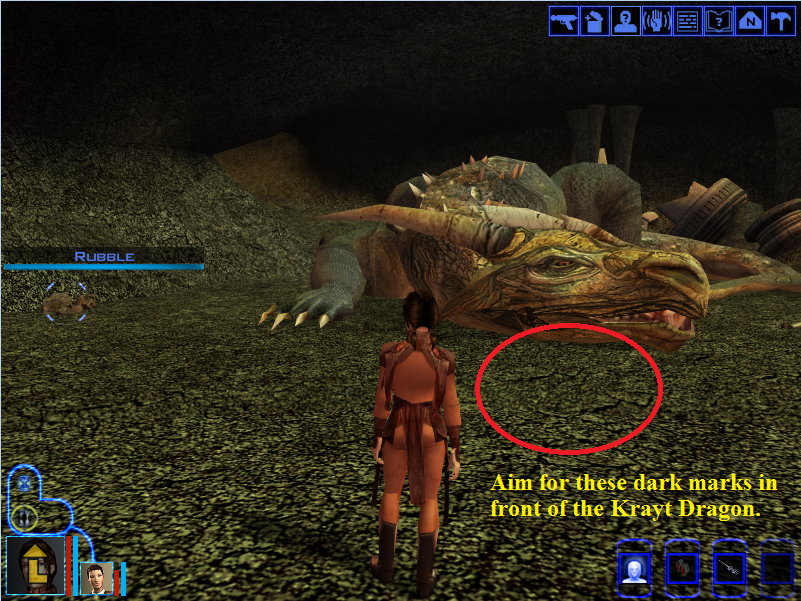
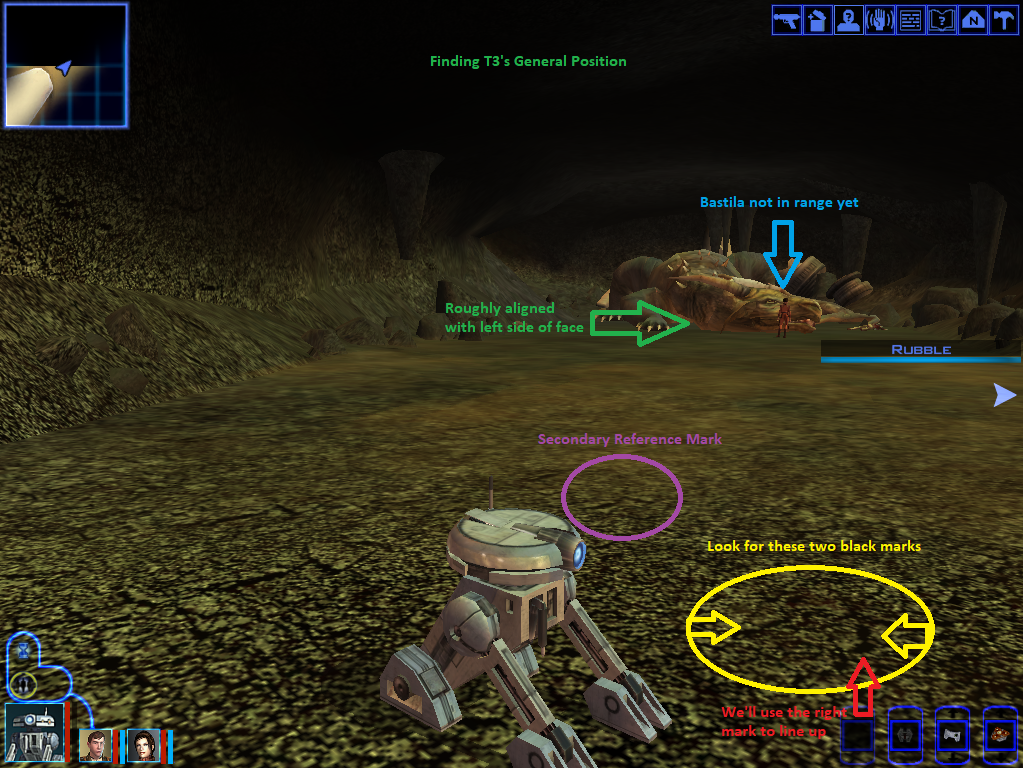
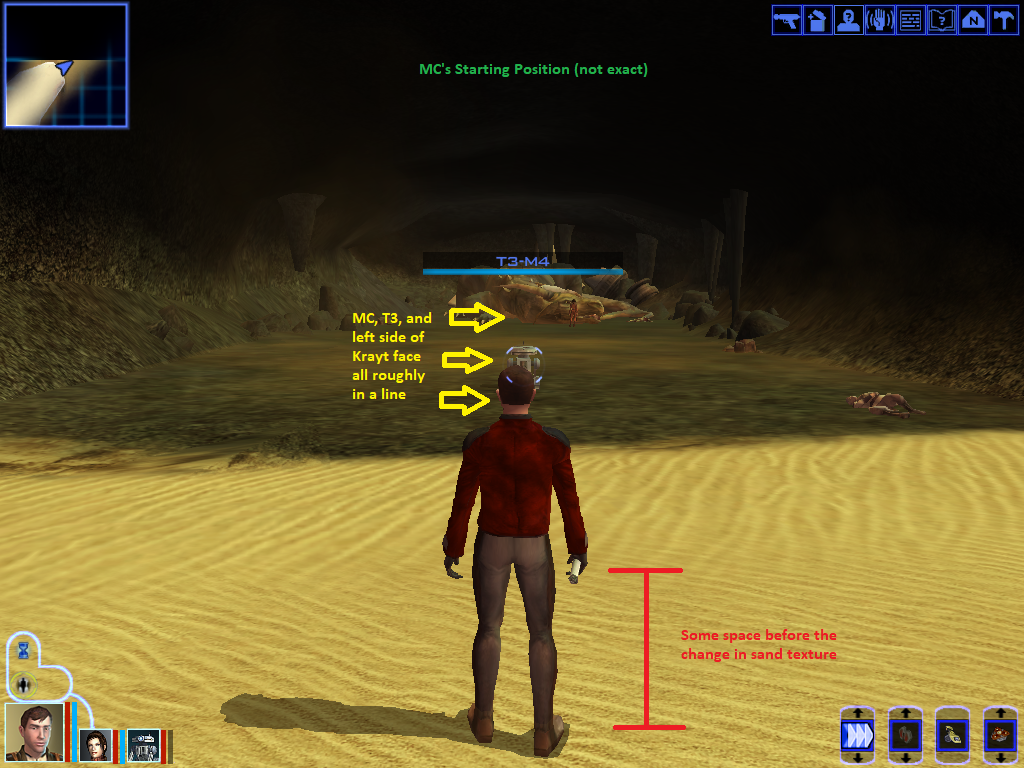
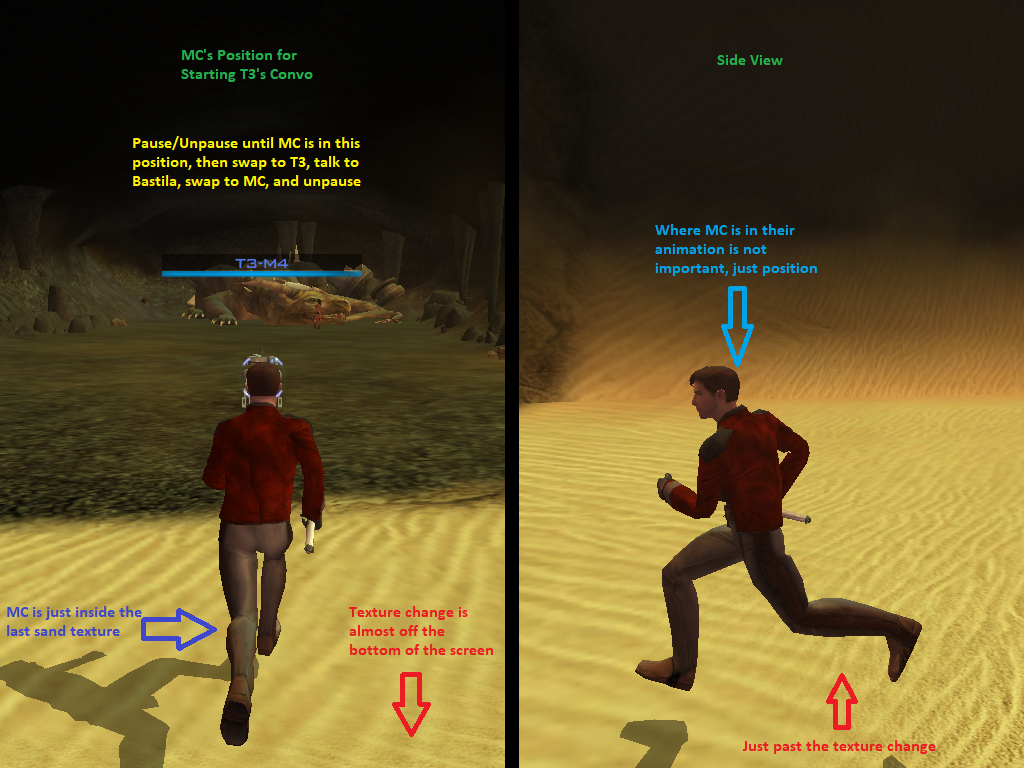
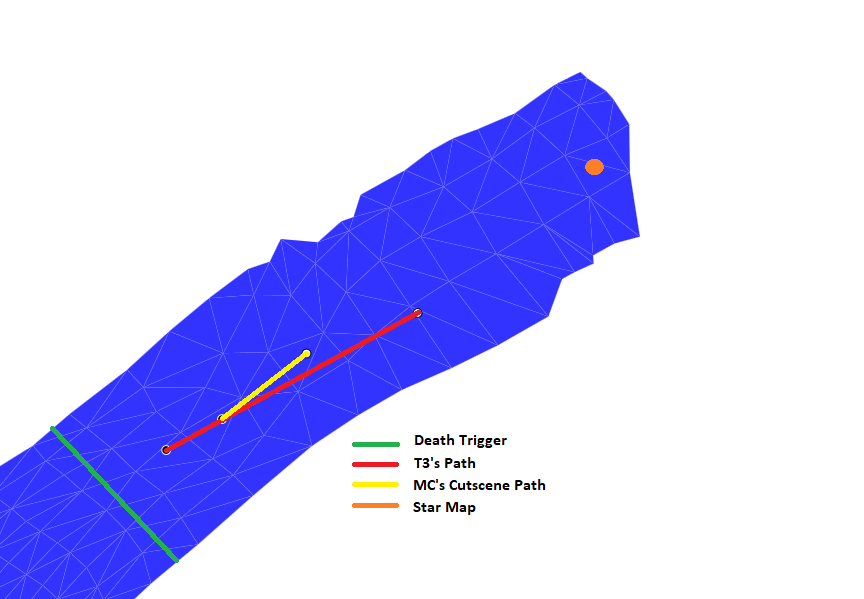